Printing
Print Basics [F12]
If you wish to print a copy of the chart on the screen:
- Click File on the main menu.
- Select
 Print
from the drop-down menu.
Print
from the drop-down menu.
You will then be prompted as to whether you want to print the chart with a white background (and default color scheme). This is recommended - for greater clarity and to save ink.
Detailed Information
Default Settings
The printer is set for the following defaults:
- Landscape orientation;
- High resolution; and
- Single page output.
Advanced Printer Settings

Override Default Behavior
These options override the above default settings:
Don't Force Landscape Printing
When checked, this option refers to Printer Setup for page orientation, instead of forcing landscape orientation.
Don't Use Color Reduction
The default is to reduce to 256 colors - to speed up printing and reduce memory use.
When checked, the application will use the color settings from your operating system (see Windows>> Control Panel >> Display >> Settings >> Color Quality). No color reduction will apply.
Printing Difficulties
If charts will not print, or do not print correctly, please check the Send Email and File >> Save Chart As Image functions:
- If these functions are not working, please contact Support
- If they are working, then the problem is most likely caused by your hardware configuration. Experiment with the settings below:
|
By Default the printer component prints at the full resolution of the printing device. For some systems, the size of the print job can overwhelm the driver. You have two different switches to help with this, our WinStretch switch, and our Compress switch. It's worth noting that this option has never been documented as useful, however in the interest of reliable printing, we include it, as we felt that the possibility exists that it will be useful - SleepBit slows printing down a little to assist difficult printers - Remember, most drivers do not need this, and it can really slow your print job to a crawl. Help! My Xerox WorkCentre does not print! SleepProc checked is reported to also be successful with printers from Brother, Sharp, and Zenographics. SleepProc is a different variation on the theme of SleepBit which assists with printing on Xerox WorkCentre - Remember, most drivers do not need this, and it can really slow your print job to a crawl. By default the printer component uses DIB printing and calls the Windows StretchDIBits() function. While this should always work, if the call fails, we automatically drop back to using DDB printing and call BitBlt() or StretchBlt(). The reason why you should have a switch to force the use of DDB printing is that sometimes, a driver will claim that the StretchDIBits() call was successful, even though it failed. Of course, in this situation, our automatic recovery will not detect the failure, thus the need for a switch to force the use of DDB printing. Setting this option can often reduce the size of your print job dramatically. Allow Windows to stretch the output! By default the printer component prints at the full resolution of the printing device. For some systems, the size of the print job can overwhelm the driver - this, like the Compress option, assists in this scenario. |
Magnification
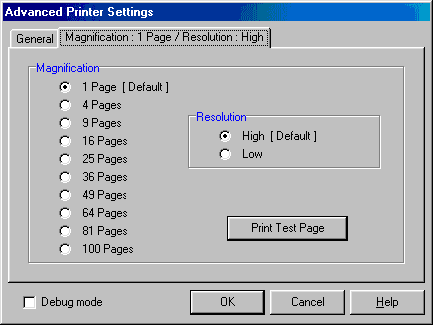
- The default is set to single page output.
- Selecting 4 Pages will magnify a chart image and print it across 4 pages.
- Selecting 100 Pages will consume copious amounts of paper and printer ink. Please do not try this without first experimenting with lower magnifications (e.g. 4 Pages) and/or printing a test page!
Print Test Page
The Print Test Page button prints a single test page - the topmost left corner page when using Magnification settings. It is advisable to check your output before undertaking a large print magnification.
Resolution
The default is set to High Resolution. Low resolution is quicker but uses more ink.
- High Resolution is more important with magnification of 4 or more pages.
- High Resolution uses more resources. Switch to Low Resolution if you get OUT OF RESOURCES errors.
- High Resolution setting is double that of Low Resolution.
- 1 Page magnification with Low Resolution produces about the same size output as 4 Page magnification with High Resolution.
- Above 4 Page magnification the output simply expands, since Windows cannot handle bigger bitmaps.
Debug
The Debug check box option provides detailed debug information while printing.